OAuth2.0是什么
用于REST/APIS的代理授权框架(delegatedauthorizetion framework),基于令牌token的授权,在无需暴露用户密码的情况下,使应用能够对用户数据有效访问权限,充分解耦认证和授权,实际上是标准的安全架构,支持多种应用场景,服务器端WebApp,浏览器单页面SPA,无线原生App,服务器与服务器之间访问。像仆从钥匙,给应用授权优先的访问权限,代表用户访问用户数据。OAoth是系统之间代理授权协议
优点
- 易实现
- 安全,服务端不接触用户密码,服务单更容易集中保护。
- 广泛传播被持续采用
- 短寿命和封装的token
- 资源服务器和授权服务器解耦
- 集中授权简化客户端
- HTTP/JSON友好易于请求和传递token
- 考虑多种客户端架构场景
- 客户可以具有不同的信任级别
缺点
- 协议框架太宽泛,造成各种实现的兼容性和互操作性
- 与OAuth1.0不兼容
- OAuth 2.0 不是一个认证协议,OAuth2.0本身并不能告诉你任何用户信息
架构角色
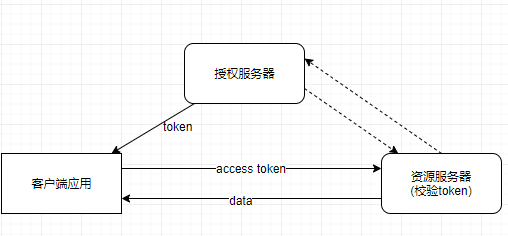
1.授权服务 Authorization Service
客户应用成功认证并获得授权之后,向客户应用颁发访问令牌。
2.资源服务 Resource Service
一个web服务或者web应用,保存用户受保护的数据
3.客户端应用 Client Application
通常是一个浏览器或者手机app,它需要用户受保护的数据
4.资源拥有者 owner
数据拥有者,想把数据分享给他人使用
客户端应用需要访问资源服务,但是没有认证,此时客户端去授权服务获取认证令牌,拿到令牌后交给资源服务器,资源服务器拿到令牌后也去授权服务比较一次,如果是对的,就认证通过.
OAuth2.0语术概念
1.客户凭证 Client Credentials
客户的clientId和密码用户认证客户
2.令牌 Tokens
授权服务器在接收到客户请求后颁发的资源服务器
令牌类型
- 授权码 (Authorization Code Token) 仅用于授权码类型,用于交换获取访问令牌和刷新令牌
- 刷新令牌 (Refresh Token) 用于去授权服务器获取一个新的token
- 访问令牌 (Access Token) 代表用户直接访问受保护的资源服务器
- Bearer Token 不管谁拿到都可以访问资源
- Proof of Prosession Token 可以校验Client是否对Token有明确的权限
3.作用域
客户请求访问令牌时,有资源拥有者额外指定的细分权限
应用场景,解决方案
一、开放间系统授权
1.社交联合登陆
2.开放API平台
二、现代微服务安全
1.单页面浏览器APP
2.无线原生APP
3.服务端WebApp
4.微服务和原生API调用
三、企业内部认证授权(IAM,SSO)
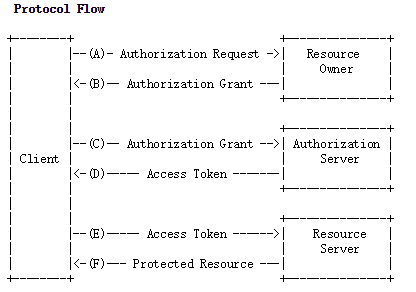
AOuth Flow
推荐两篇文章
https://tools.ietf.org/html/rfc6749
客户端的授权模式
1. 授权码模式
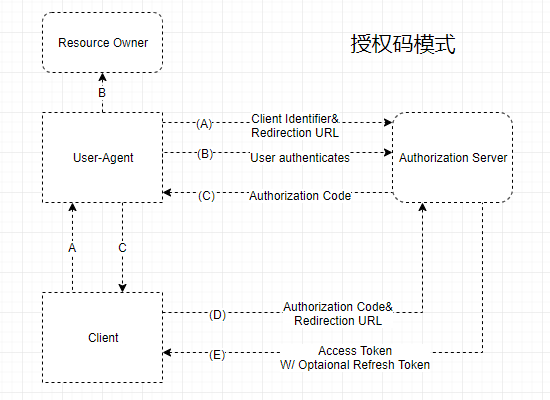
授权步骤
- A.用户访问客户端,客户端重定向到认证服务器.
- B.用户选择授权客户端
- C.如果用户授权,授权服务器重定向到客户端带来的url并附加一个授权码
- D.客户端附带重定向url和授权码后台请求授权服务器申请令牌
- E.授权服务器校对授权码和重定向url,确认无误,向客户端发送访问令牌(Access Token)和刷新令牌(Refresh Token)
基于spring security oauth2.0搭建最简授权码模式服务器
一、 源码
资源服务器和授权服务器一起案例
引入jar包
   	<dependency>
	<groupId>org.springframework.boot</groupId>
	<artifactId>spring-boot-starter-security</artifactId>
</dependency>

<!-- OAuth 2.0 -->
<dependency>
	<groupId>org.springframework.security.oauth</groupId>
	<artifactId>spring-security-oauth2</artifactId>
</dependency>
添加授权服务器配置
|
- 添加资源服务器配置
//资源服务配置 |
- 配置添加授权用户
# Spring Security Setting |
- 添加资源服务器api入口
|
- 启动服务器
二、实践
- 获取授权码
请求:
打开浏览器 输入地址:
http://localhost:8080/oauth/authorize?client_id=clientapp&redirect_uri=http://localhost:9001/callback&response_type=code&scope=read_userinfo |
输入用户名和密码,选择授权。
请求:
页面会跳转一个callback地址加授权码http://localhost:9001/callback?code=4PFZ2w
- 获取令牌
请求:curl -X POST --user clientapp:123456 http://localhost:8080/oauth/token -H
"content-type: application/x-www-form-urlencoded" -d
"code=4PFZ2w&grant_type=authorization_code&redirect_uri=http%3A%2F%2Flocalh
ost%3A9001%2Fcallback&scope=read_userinfo"
响应:{"access_token":"44a572ca-3a05-40ba-a557-35955179e143","token_type":"bearer","expires_in":43199,"scope":"read_userinfo"}
- 访问资源,调用API
请求:
curl -X GET http://localhost:8080/api/userinfo -H "authorization: Bearer 44a572ca-3a05-40ba-a557-35955179e143" |
响应:
{"name":"user1","email":"user1@hello.com"} |
特点
- 通过前端渠道客户获取授权码
- 通过后端渠道,客户使用authorization code 交换access token 或refresh token
- 假定资源拥有者和客户在不同的设备上
- 最安全的流程,因为令牌不会传递经过User-Agent
总结: 授权码模式本质上是客户端通过用户名密码发起获取授权码请求,服务端根据回调地址返回授权码,客户端根据授权码访问资源服务器,资源服务器根据授权码拿到授权服务器给的access token返回给客户端,客户端就可以带着这个access token访问资源服务器上的有效资源.
2. 简化模式
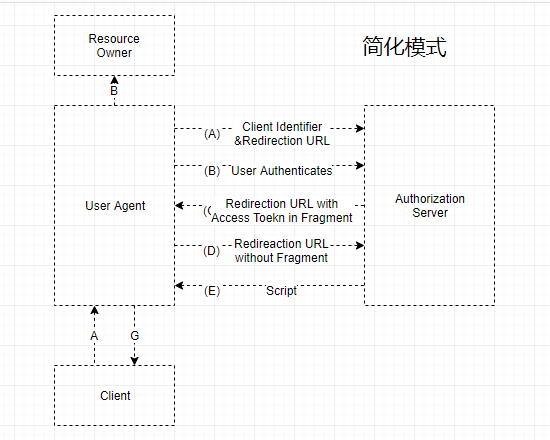
授权步骤
- 客户端重定向用户到认证服务器
- 用户选择是否授权给客户端
- 用户授权,授权服务器根据客户端请求参数uri重定向到客户端,并将token放入url的hash部分
- 资源服务返回一个页面,可以获取hash值
- 浏览器执行脚本获取令牌
- 浏览器叫令牌发送给客户端
基于spring security oauth2.0搭建简化模式服务器
一、 源码
资源服务器和授权服务器一起案例
- 引入spring security 和 oauth jar包
- 授权服务器配置
//简化服务器配置 |
二、操作
- 获取令牌
访问浏览器输入配置的用户和密码,选择授权。http://localhost:8080/oauth/authorize?client_id=clientapp&redirect_uri=http://localhost:9001/callback&response_type=token&scope=read_userinfo&state=abc
响应:
http://localhost:9001/callback#access_token=d678754d-752c-46cc-9a9b-d59ae830cddb&token_type=bearer&state=abc&expires_in=119 |
- 访问资源,调用API
curl -X GET http://localhost:8080/api/userinfo -H "authorization: Bearer d678754d-752c-46cc-9a9b-d59ae830cddb" |
响应:{"name":"user1","email":"user1@hello.com"}
特点
- 适用于公开的浏览器单页面应用
- Access Token 直接从授权服务器返回
- 不支持Refresh Token
- 假定资源拥有者和客户在同一设备上
- 最容易受安全攻击
总结:简化模式,就是没有授权码的授权模式,去掉了授权码这个步骤。
3. 密码模式 Resource Owner Password Credential Grant
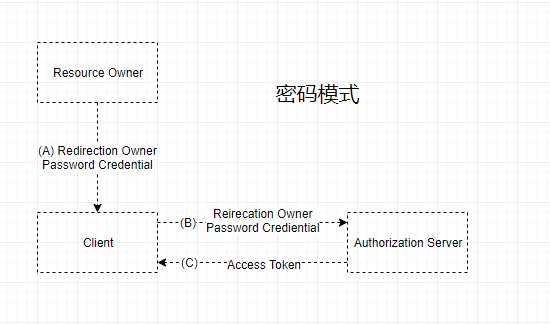
授权步骤
- 用户向客户端提供用户名和密码
- 客户端将用户名和密码发送给认证服务器去认证授权
- 认证服务器验证无误,返回给客户端令牌
基于spring security oauth2.0搭建密码模式服务器
一、代码
授权服务器配置// 授权服务器配置
@Configuration
@EnableAuthorizationServer
public class OAuth2AuthorizationServer extends
AuthorizationServerConfigurerAdapter {
// 用户认证
@Autowired
private AuthenticationManager authenticationManager;
@Override
public void configure(AuthorizationServerEndpointsConfigurer endpoints)
throws Exception {
endpoints.authenticationManager(authenticationManager);
}
@Override
public void configure(ClientDetailsServiceConfigurer clients)
throws Exception {
clients.inMemory()
.withClient("clientapp")
.secret("123456")
// 密码模式
.authorizedGrantTypes("password")
.scopes("read_userinfo", "read_contacts");
}
}
一、操作
- 获取令牌
curl -X POST --user clientapp:123456 http://localhost:8080/oauth/token -H "accept: application/json" -H "content-type: application/x-www-form-urlencoded" -d "grant_type=password&username=user1&password=passwd1&scope=read_userinfo" |
响应:
{"access_token":"9247e26e-b9d7-488b-88b0-25fb046ac7ce","token_type":"bearer","expires_in":43163,"scope":"read_userinfo"} |
- 访问资源,调用API
curl -X GET http://localhost:8080/api/userinfo -H "authorization: Bearer 9247e26e-b9d7-488b-88b0-25fb046ac7ce" |
响应:
{"name":"user1","email":"user1@hello.com"} |
特点
- 使用用户名密码登录的应用,比如桌面应用
- 使用用户名/密码作为授权方式从授权服务器上获取access token
- 一般不支持refresh token
- 假定资源拥有者和公开客户在相同设备上
总结:密码授权模式,是对客户端极度信任的情况下,将用户名和密码交给客户端,客户端去授权服务器获取令牌。
4. 客户端模式

授权步骤
- 客户端直接向授权服务器发起授权认证,获取令牌
- 授权服务器校验通过,颁发令牌
基于spring security oauth2.0搭建客户端模式服务器
一、代码
授权服务器配置
// 授权服务器配置
@Configuration
@EnableAuthorizationServer
public class OAuth2AuthorizationServer extends
        AuthorizationServerConfigurerAdapter {

    @Override
    public void configure(ClientDetailsServiceConfigurer clients)
            throws Exception {
        clients.inMemory()
            .withClient("clientdevops")
            // 密码模式
            .secret("123456")
            .authorizedGrantTypes("client_credentials")
            .scopes("devops");
    }

}
二、操作
- 获取令牌
curl -X POST "http://localhost:8080/oauth/token" --user clientdevops:123456 -d |
响应:
{"access_token":"ab5e2936-7463-456b-9ded-aac79d9311e1","token_type":"bearer","expires_in":43199,"scope":"devops"} |
- 访问资源,调用API
curl -X GET http://localhost:8080/api/userinfo -H "authorization: Bearer ab5e2936-7463-456b-9ded-aac79d9311e1" |
响应:{"name":"user1","email":"user1@hello.com"}
特点
- 适用于服务间通信,机器代表用户或者它自己
- 只有后端渠道,使用客户凭证获取一个access token
- 因为客户凭证可以使用对称或者非对称加密,该方式支持共享密码或者证书
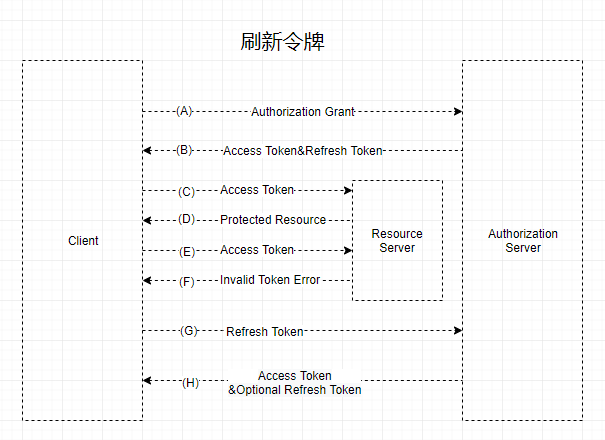
刷新令牌
一、代码
//授权服务器配置 |
安全配置
@Configuration
@EnableWebSecurity
@EnableGlobalMethodSecurity(prePostEnabled = true) //启用方法级的权限认证
public class SecurityConfiguration extends WebSecurityConfigurerAdapter {
    @Bean
    @Override
    protected UserDetailsService userDetailsService() {
        InMemoryUserDetailsManager manager = new InMemoryUserDetailsManager();
        manager.createUser(User.withUsername("user1").password("passwd1").authorities("USER").build());
        manager.createUser(User.withUsername("root").password("root").authorities("USER").build());
        return manager;
    }

    @Bean
    @Override
    public AuthenticationManager authenticationManagerBean() throws Exception {
        return super.authenticationManagerBean();
    }
}
二、操作
获取令牌curl -i -X POST --user clientapp:123456 http://localhost:8080/oauth/token -H "accept: application/json" -H "content-type: application/x-www-form-urlencoded" -d "grant_type=refresh_token&refresh_token=dda1413c-86e8-4612-8e13-e9044e530c66"
响应:
HTTP/1.1 200 |
认证方式选择

授权服务器端点
- Authorize Endpoint (/oauth2/authorize) 认证端点
- Token Endpoint (/oauth2/token) 令牌端点
- Introspection Endpoint (/oauth2/instrospection) 检查端点
- Revocation Endpoint (/aouth2/revoke) 吊销端点
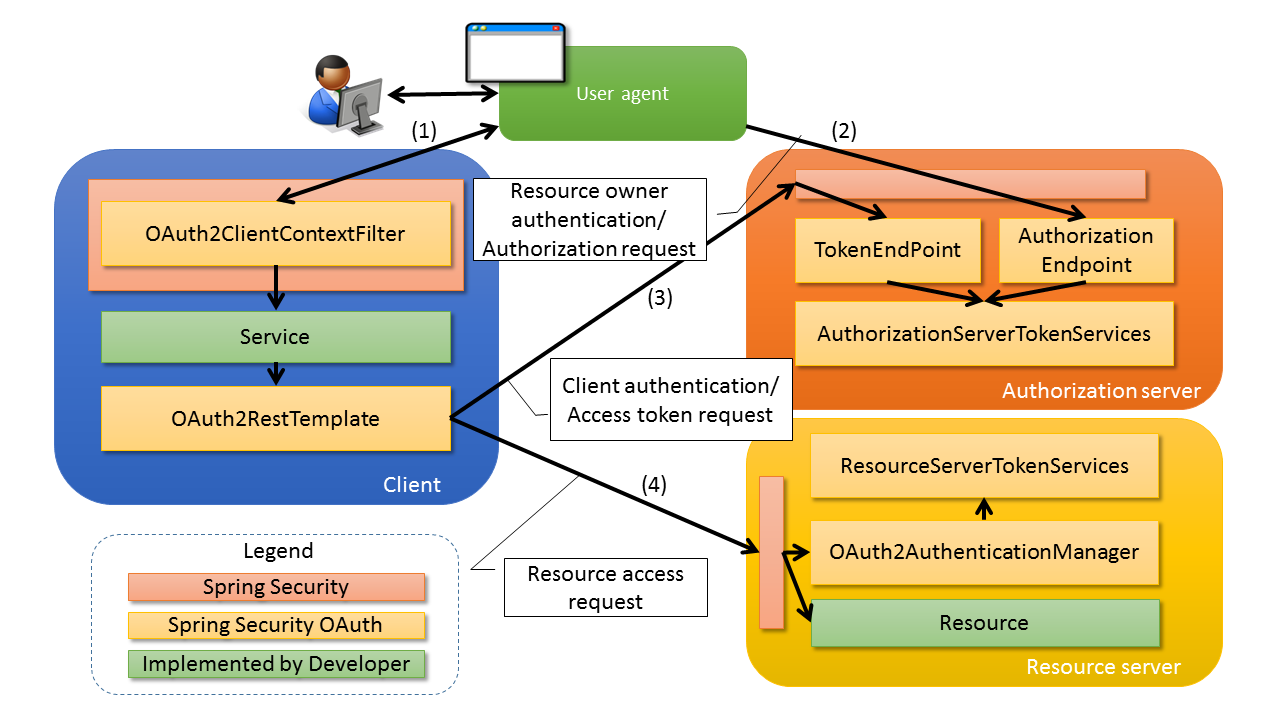
Spring Security OAuth2.0架构
http://terasolunaorg.github.io/guideline/5.3.0.RELEASE/en/Security/OAuth.html